Friday 28 June 2013

Homemade (super spicy) Salsa

http://oneparticularkitchen.com/2009/05/19/salsa/


Tuesday 30 October 2012

Classic Ice Cream Sandwiches (for dinner)

Happy Smitten Kitchen book day! Today the cookbook comes out, and in 17 days I will be meeting Deb on her book tour and getting her to sign my pre-ordered copy :))

To continue the countdown, I am making the ice cream sandwiches another go. I first made them in the summer for a friend's pot-luck, and have made them again today in a new shape and with a more adventurous ice cream flavor. Initially I made them in the classic rectangle, and used a knife to cut up a block of vanilla Chapmans into slabs to fit into my sandwiches. They were then wrapped in tin-foil and transferred in a cooler with ice packs to the party.

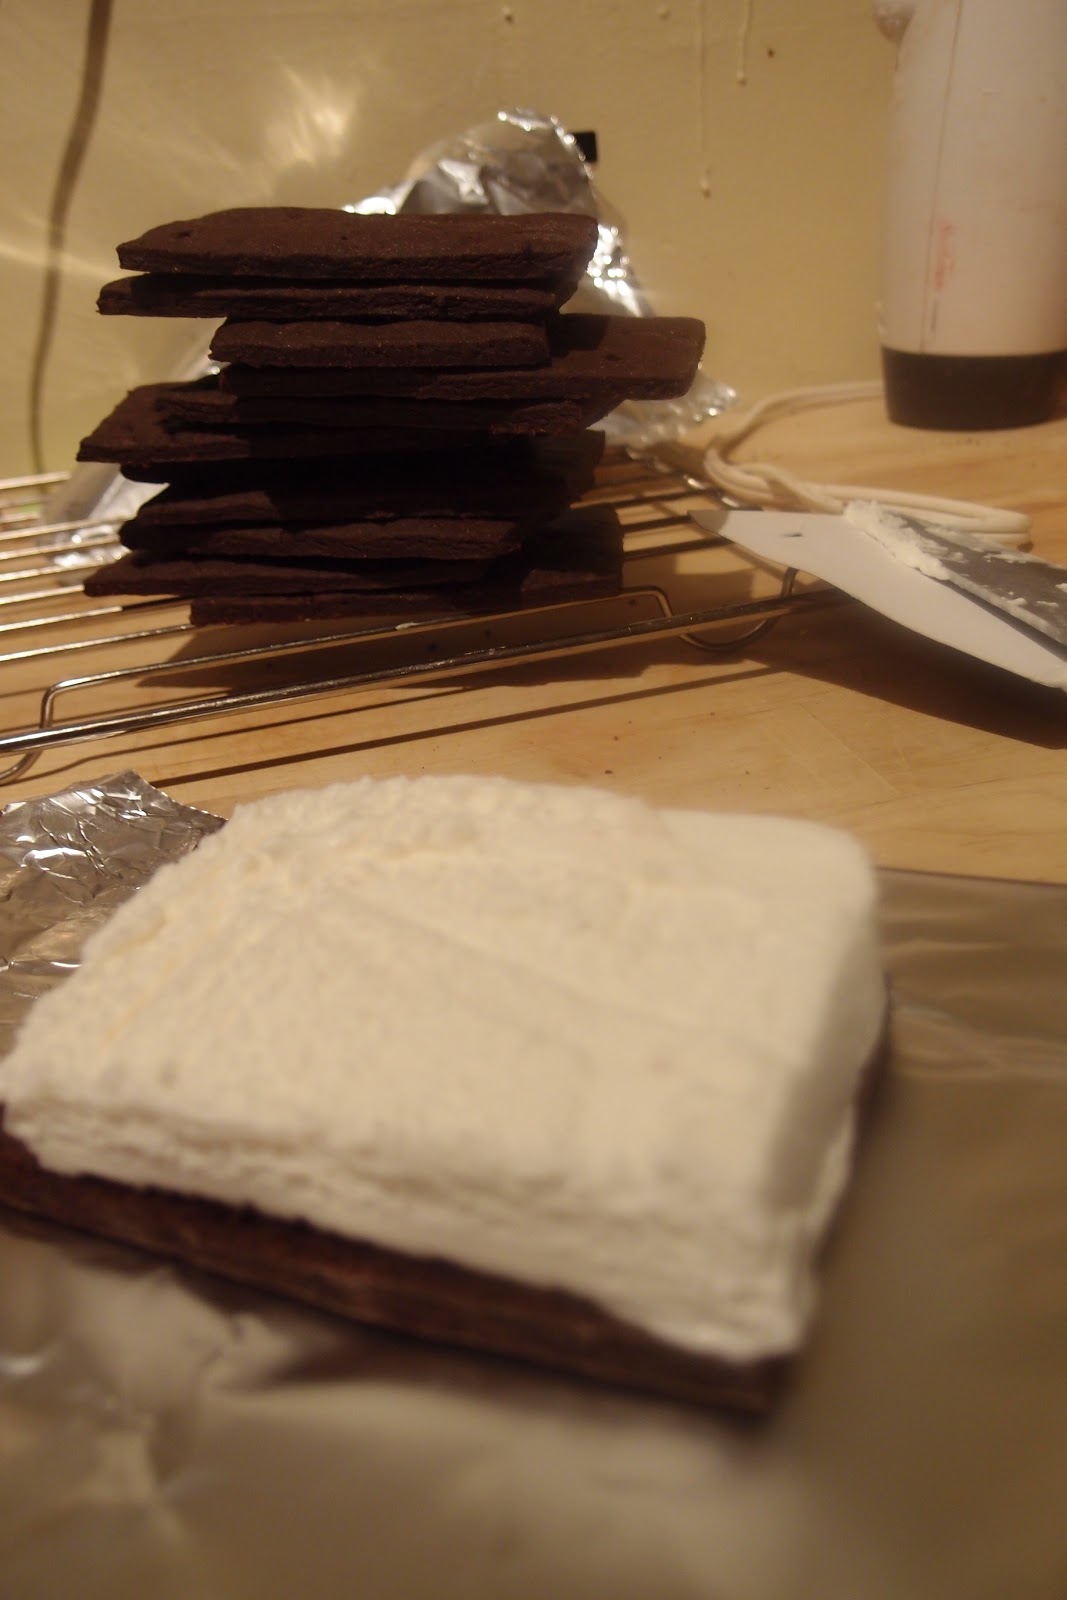
Second time around, I baked them for less time in attempts to make the cookie softer. They are circular and I used President's Choice Mocha Almond fudge! I scooped and molded the ice cream on the cookie.

I have yet to try Deb's way of preparing the ice cream filling, but have included her instructions.


Cookies
2 2/3 cups (335 grams) all-purpose flour
2/3 cup plus 1/4 cup (75 grams) extra dark or Dutch-processed unsweetened cocoa powder
1 1/4 cups (2 1/2 sticks or 285 grams) unsalted butter, softened
1 cup (200 grams) granulated sugar
3/4 teaspoon table salt
2 large egg yolks
1 tablespoon vanilla extract
Filling
1/2 gallon (8 cups or approximately 1050 grams, weight will vary by brand/variety) ice cream, your choice of flavor (I used cookies and cream), softened
Preheat oven to 350°F degrees. Line two baking sheets with parchment paper. Sift the flour and cocoa together (I am generally too lazy to sift things but cocoa is really lumpy so don’t skip this) and set aside. In the bowl of a standing mixer with a paddle attachment, beat the butter, sugar, and salt together until light and fluffy. Add the yolks and vanilla and mix until combined, then scrape down sides and mix briefly again. Add the flour mixture a little at a time then mix until combined.
Transfer the dough to a lightly floured work surface and divide into two equal pieces. If the dough is too soft to handle, wrap and chill it until firm enough to roll out (I recommend 30 minutes only; any longer and it becomes crumbly to roll out). Roll each batch into a 1/4-inch thick rectangle, about 10 by 8 inches. Cut into a total of 24 20 2-by-4-inch rectangles. You may have enough extra to reroll the scraps and create 4 more 2-by-4-inch rectangles, in which case, you could make two additional sandwiches.
Use an offset spatula to transfer the rectangles to the prepared sheets; you’ll only need an inch space between them. Use the tip of a thermometer (totally brilliant tip from Amy, by the way; it made far better indentations than skewers that I usually use for docking) to poke the cookies with holes (Amy recommends 14 holes but I used this as my guide and made more).
Bake the cookies for 16 to 18 minutes, or until they stay firm when tapped in the center. Transfer to a wire rack to cool completely. Repeat with remaining cookie dough, rerolling scraps as needed.
Meanwhile, line the bottom of a 9-by-13-inch pan with parchment paper, allowing it to overhang on two sides (it will act as a sling for the ice cream). Spread the softened ice cream into the pan, smooth the top and freeze until firm, about one hour (or longer if your freezer is as terrible as mine).
Run a knife along the exposed sides of the pan to loosen the ice cream. Holding onto the parchment paper, lift ice cream out of the pan and onto the work surface. Using one of the cookies as a template, cut ice cream into 10 to 12 2-by-4-inch bars (cut the number of cookie pairs your batch yielded). Strangely, I found using kitchen shears to go right through the ice cream and the paper underneath the easiest. I then flipped each piece of ice cream onto a cookie, peeled off the paper, and finished sandwiching the rectangle of ice cream with a second cookie.

Monday 29 October 2012

Smitten Kitchen Green Bean Salad

It has probs been about a century since I posted. Lots of changes, and have been feeling guilty about neglecting my food-blogging habits. Especially since the Smitten Kitchen Cookbook comes out tomorrow, and I can't rave enough about how much Deb has inspired me in all things food and amazing. I have obvs purchased tickets long ago for the book tour, and in my countdown to meeting her, I am making a glorious return. First with Deb's green bean salad.

I first tried this recipe as my contribution to Thanksgiving dinner, and since has become one of my fave easy and healthy go-to's. I altered the recipe a little bit by adding mini bocconcini cheese, a very welcome and tasty addition once it has sat in the dressing for a bit.

Green Bean and Cherry Tomato Salad
Adapted from Smitten Kitchen

Serves 6
1 pound green beans, though if you can find a mix of green and yellow beans, it will be all the prettier
1 pound cherry tomatoes
1 large shallot
2 tablespoons red wine vinegar
Salt and pepper
1/3 cup extra-virgin olive oil
Basil or other herb (optional, I used basil)
1 cup mini bocconcini cheese, cut in halves

Prepare the vegetables: Top and tail the beans and cut them into large segments. Parboil the beans in salted water until just tender, about four to five minutes. Drain and immediately spread them out to cool. Stem the cherry tomatoes and cut them in half.
Make the vinaigrette: Peel and mince the shallot and put it in a bowl with the vinegar and salt and pepper. Whisk in the olive oil. Taste and adjust the balance with more vinegar, oil, or salt, as needed. Toss the cherry tomatoes and bocconcini in with the vinaigrette; this can sit for a while. Do not add the green beans until just before serving or they will discolor from the acid in the vinaigrette. For variety, the salad can be garnished with basil or some other fresh herb such as parsley, chervil or hyssop.
Do ahead: Beans and vegetables can be prepared ahead of time. Simply toss with the dressing only at the last minute, as it can discolor the green beans after several hours.

Monday 21 May 2012

David Lebovitz's (long weekend) Cream-cheese Brownies

All I can say is that these were an excellent long weekend treat and I had to resist keeping it all to myself! :)


Cheesecake Brownies (from David Lebovitz)
One 9-inch (23cm) or 8-inch (20cm) square pan

For those of you who like higher brownies, use an 8-inch pan.
6 tablespoons (85g) unsalted butter, cut into pieces
4 ounces (115g) bittersweet or semisweet chocolate, chopped
2/3 cup (130g) sugar
2 large eggs, at room temperature
1/2 cup (70g) flour
1 tablespoon unsweetened cocoa powder
1/8 teaspoon salt
1 teaspoon vanilla extract
1/2 cup (80g) chocolate chips
8 ounces (200g) cream cheese, at room temperature
1 large egg yolk
5 tablespoons (75g) sugar
1/8 teaspoon vanilla extract

1. Line a 9-inch (23cm) or 8-inch (20cm) square pan with foil, making sure it goes up all four sides. Use two sheets if necessary. Mist with non-stick spray or grease lightly.
2. Preheat oven to 350 degrees (180C).
3. In a medium saucepan, melt the butter and chocolate over low heat, stirring until smooth. Remove from heat and beat in the 2/3 cup (130g) sugar, then the eggs.
4. Mix in the flour, cocoa powder and salt, then the vanilla and chocolate chips. Spread evenly in the prepared pan.
5. In a separate bowl, beat together the cream cheese, the yolk, 5 tablespoons (75g) of sugar, and vanilla until smooth.
6. Distribute the cream cheese mixture in eight dollops across the top of the brownie mixture, then take a dull knife or spatula and swirl the cream cheese mixture with the chocolate batter.
7. Bake for 35 to 40 minutes, or until the batter in the center of the pan feels just set.
Let cool, then lift out the foil and peel it away. Cut the brownies into squares.
Storage: These will keep in an airtight container for a couple of days. They also freeze well, too.

Wednesday 9 May 2012

Pineapple-Coconut Macaroons

It's raining and it's really pouring in Toronto, and I only have about four more days off before I dress myself in some scrubs and get to work. The idea to make macaroons half came from my friend and I joking about these expensive vegan macaroons we saw someone bring to a bar and eat, and half came from David Lebovitz. Since his brownies were really the "absolute", I had high expectations for these pineapple macaroons (to be fair, he never made such a claim on these). They were just okay to good to satisfy a sweet tooth, not as magical and comforting as his brownies.


Pineapple-Coconut Macaroons (from David Lebovitz)
About 35 cookies


David Lebovitz's note: I prefer to use unsweetened pineapple packed in its own juice, but if you can only find pineapple packed in light syrup, reduce the amount of sugar to 3/4 cup (150 g) for caramelizing the pineapple. If you want to use fresh pineapple, you’ll need 1 1/4 cups of caramelized crushed pineapple paste.
My note: I used sweetened pineapple and think I should have used less sugar so that it was stickier and easier to mold.


One 20 ounce (about 600 g) can crushed unsweetened pineapple
1 cup (200 g) sugar
pinch of salt
3 1/2 cups (245 g) dried unsweetened shredded coconut
3 large egg whites
1/2 teaspoon vanilla extract


1. Put the pineapple in a wide skillet (preferable nonstick) with the sugar and a pinch of salt.
2. Cook the pineapple until the liquid is evaporated, then continue to cook, stirring constantly, until the pineapple gets thick and sticky, and just begins to brown. Remove from heat and scrape the caramelized pineapple into a large bowl. Then mix in the coconut into the pineapple, then the egg whites and vanilla.
(The mixture may be rather difficult to mix with a spatula. You can mix it with a stand mixer fitted with the paddle attachment or use your clean hands.)
3. Preheat the oven to 350ºF (180ºC). Line a baking sheet with parchment paper.
4. Use your hands to gather a bit of the batter, about the size of an unshelled walnut, and form it into a round or a pyramid-like shape, onto the prepared baking sheet. Continue forming all the cookies then bake them for about 30 minutes, rotating the baking sheet midway during baking. The cookies are done when they are nicely browned up the sides (I failed to make a pyramid-like shape, so settled for a blob/dome shape)

Storage: These cookies are best served the day they’re made, since over time, they’ll lose their slightly crunchy crusts. You can store the batter up to five days in the refrigerator and bake them off as desired.

Tuesday 8 May 2012

Red Lentil Dahl

I have this week off before I start my five week placement at a long term care facility. Working 7am-3pm will be quite an adjustment. I should probably start finding some easy and affordable lunch/dinner recipes that I can make useful for the next month and some, and even the future.

Something I do love is mushy food. Like mushy French fries and rice with stuff on it, risotto, mashed potatoes. Smoothies, Greek yogurt... You get the point. So I decided to venture into the world of Indian cooking and make some red lentil dahl.

It didn't take too long and it was pretty easy and delicious. I took two recipes and kind of blended the aspects I liked of each, into one recipe. Then I paired it with brown rice :)


Red Lentil Dahl (a fusion of the Taste.com.au recipe and one from The Taste Traveller)

  • 2 cups (475 ml) masoor daal (red lentils)
  • 3 cups (720 ml) water
  • 1/2 teaspoon turmeric powder
  • 3 cm fresh ginger, sliced
  • 3 tablespoons (60 ml) vegetable oil
  • 1/2 teaspoon cinnamon
  • 2 bay leaves
  • 2 tomatoes, chopped
  • 1 large onion, finely chopped
  • 2 cloves garlic, crushed
  • 1 teaspoon cumin
  • 1/2 teaspoon (2.5 ml) chili flakes
  • salt to taste
  • 1/2 teaspoon (2.5 ml) garam masala
  • 3 to 4 tablespoons cilantro 

Directions

Wash and rinse lentils. Place lentils, 1 tablespoon of the oil, ginger, bay leaves, half of the tumeric powder and cinnamon in a large saucepan with 3 cups of cold water. Bring to the boil, reduce the heat to medium and simmer, stirring to prevent sticking for 10-12 minutes. Discard spices and set aside.

Heat the remaining oil in a large frying pan over a medium high heat. Add the onion and cook for 3 minutes. Stir in the garlic, rest of turmeric, cumin, garam marsala and chilli flakes and cook for a further minute or until fragrant. Stir in the chopped tomatoes and season to taste with salt. 
Add the lentils to the pan and mix well. 

Cook for a further 3 minutes, stirring constantly. Remove from the heat. Stir in 2 or 3 tablespoon cilantro. Top with remaining cilatro and serve with rice, naan break or pappadums. 

This can be make in advance and will keep well in the refrigerator for a few days. You can also freeze it for up to a few weeks.


Thursday 3 May 2012

Banh Mi Boys

I've recently gotten the pleasure of eating at Banh Mi Boys at Queen and Spadina and I must say that I can't wait to go back! The 3 brothers who own the shop serve their own modern take on the traditional Vietnamese banh mi sandwich, with some Korean influence as well. I had a squid taco and a beef cheek steamed bao and both were delicious as well as affordable at about $4 each. Their kimchi fries is definitely next on my list to try!